Step 5 - Opportunity close
Step 5 - Submitting on behalf, Closing RFx, Unsealing, Viewing Submissions, Analyze
View Submissions
Click to enlarge image
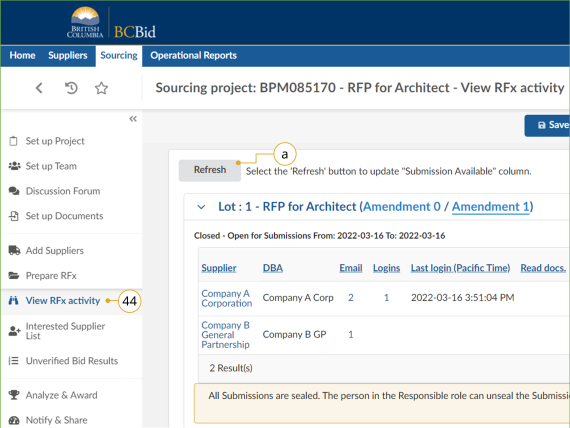
44. In the left-hand menu, click View RFx activity to review the received Submissions.
a. Click Refresh to update the Submission Available column to see which of the listed Suppliers have submitted Submissions.
Note: The Refresh button works once an opportunity is ‘Open’, if the Submissions are not sealed. The Refresh button only works once the opportunity has closed for Submissions that are sealed.
![]() Evaluations for all templates will be done outside the BC Bid application but the results can be captured in the BC Bid application.
Evaluations for all templates will be done outside the BC Bid application but the results can be captured in the BC Bid application.
Click to enlarge image
Ensure that all Submissions not submitted through the BC Bid application have been entered before BC Bid electronic Submissions are unsealed. Once BC Bid electronic Submissions are unsealed, Submissions not submitted through BC Bid application cannot be added.
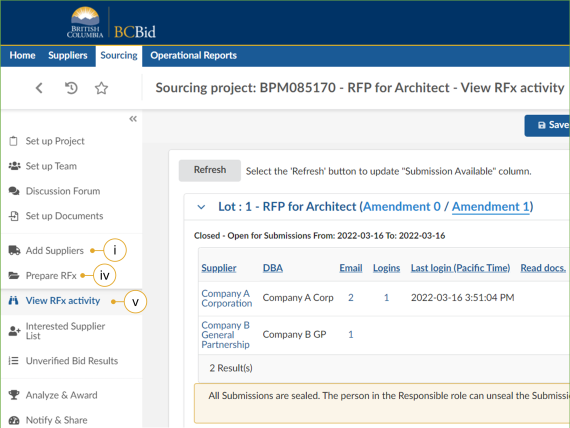
b. To add a Submission for a Supplier not listed:
i. Click Add Suppliers.
ii. Search for the Supplier and then add the Supplier.
iii. Click Save.
iv. If the Sealed Submissions checkbox in Setup tab was deselected before issuing the opportunity, click Prepare RFx menu and then click Validate & Save.
v. Return to the View RFx activity menu to start entering Submissions not submitted through BC Bid application.
NOTE: When adding suppliers, Shell Suppliers will be marked with [SHELL (Unregistered) Supplier] to the right of the supplier’s name.
Uploading Submissions
Submissions that are only to be viewed after Closing Date and Time, are uploaded after the opportunity is closed.
Click to enlarge image
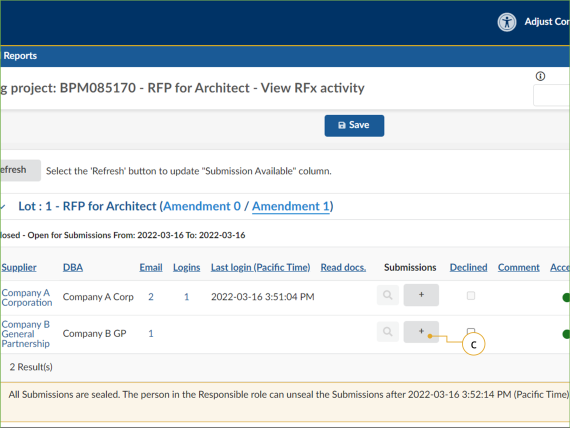
c. In the Submissions column, click the + button to manually add a Submission not submitted through BC Bid application.
Note: If a supplier is not listed on the View RFx tab, see Add Suppliers to add them before uploading the submission.
Click to enlarge image
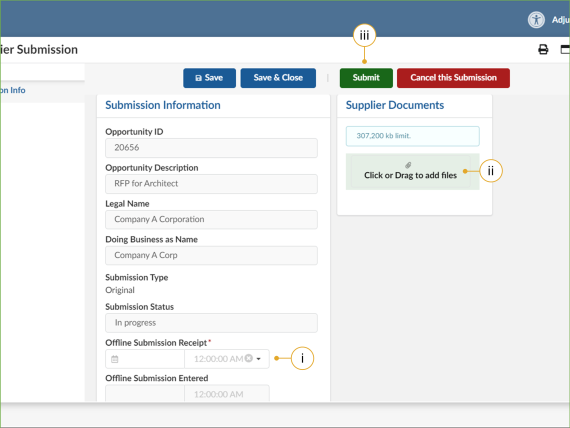
i. In the Supplier Submission dialog box, select the Offline Submission Receipt date and time.
Note: Offline submission receipt dates and times entered during the unverified bid results process will auto-populate when entering subsequent hardcopy submissions.
ii. Optional: Upload the Submission by clicking Click or Drag to add files button or directly dragging and dropping files onto the button.
Note: document count field will detail the number of documents attached to the submission
iii. Click Submit.
Click to enlarge image
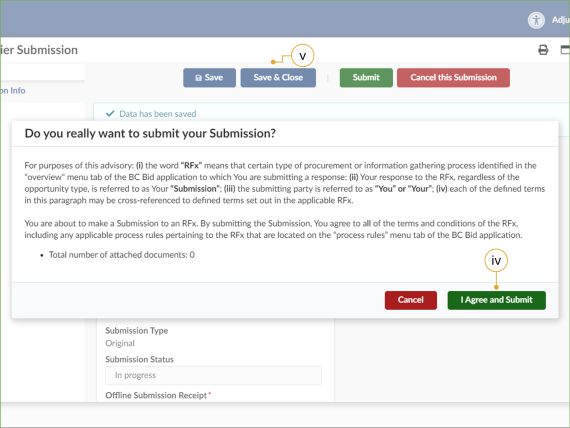
iv. Review the dialog box and click I Agree and Submit.
Note: As a Buyer you are not agreeing to this dialog box advisory. It is a step required to upload a Submission into the BC Bid application for creation of the contract award notice within your opportunity.
v. Click Save & Close.
Click to enlarge image
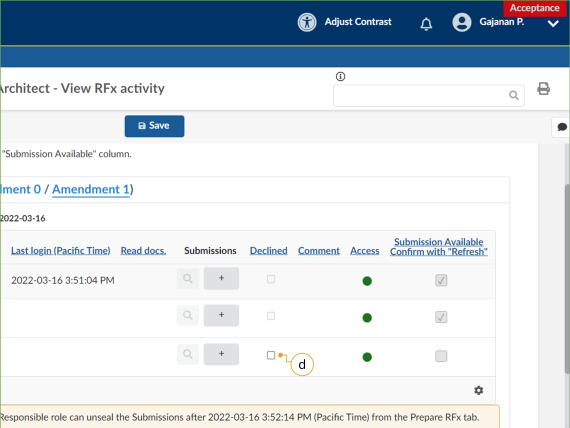
d. Optional: Select the Declined checkbox to track all invited Suppliers who did not provide a Submission.
Unsealing and Downloading Submissions
Before unsealing Submissions ensure that all Submissions not submitted through the BC Bid application have been uploaded to the opportunity.
Click to enlarge image
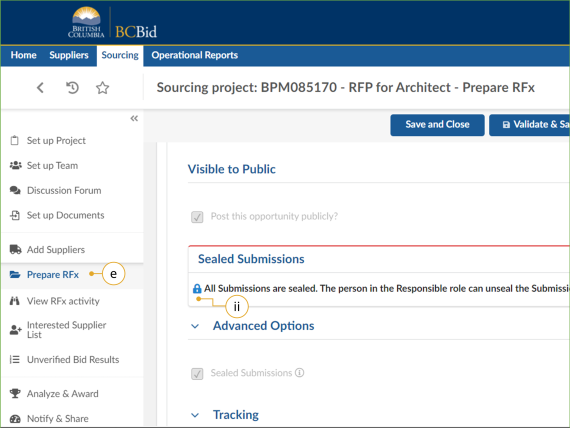
e. In the left-hand menu, click Prepare RFx.
Note: This step is applicable only if the Sealed Submissions checkbox was selected in the Setup tab.
i. On the Setup tab, scroll down to Sealed Submissions.
ii. In the Sealed Submissions section, as the user with the Responsible role, click the padlock icon to unseal the Submissions and then click OK.
Note: A pop-up will display before unsealing submissions with the following:
‘Have you uploaded ALL offline Submissions into BC Bid? If not, click CANCEL. If you click OK, you will no longer be able to upload offline Submissions. Once unsealed, offline Submissions cannot be uploaded. Please refer to your Buyer Guide for full instructions.’
Click to enlarge image
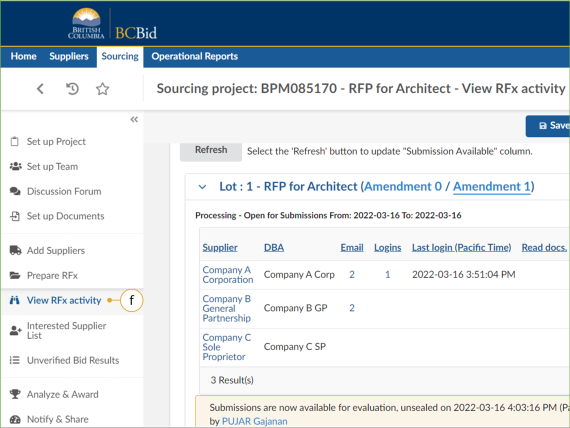
f. In the left-hand menu, click View RFx activity.
Click to enlarge image
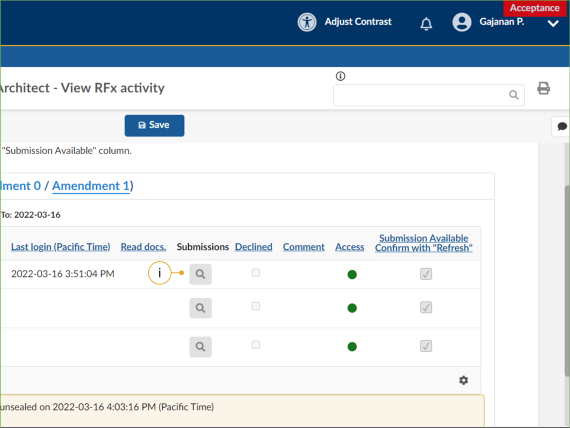
i. Click the magnifying glass icon beside each Supplier in the Submissions column to access the Submissions.
Note: To confirm if Suppliers opened all procurement documents uploaded to the Documents tab before Submission, Buyers should view the Read docs column. If, for example, five documents were uploaded to the Documents tab, and a Supplier opened all five documents before submitting a Submission, the Read docs column will display “5” for that Supplier.
![]() If the Read docs. column is not visible, select the cog icon and make the 'Read docs' column visible using the toggle button.
If the Read docs. column is not visible, select the cog icon and make the 'Read docs' column visible using the toggle button.
Click to enlarge image
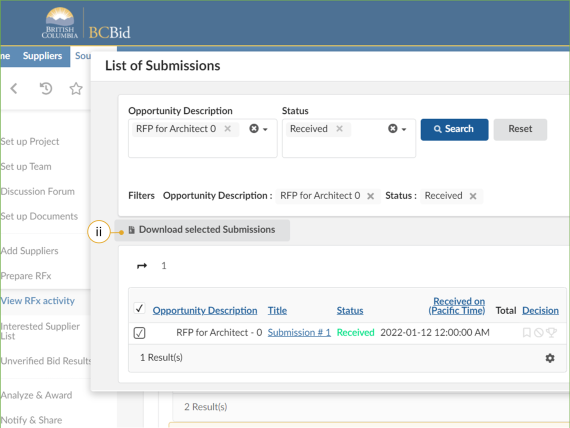
ii. Select the Submission and then click Download selected Submissions.
Note: If alternative Submissions are allowed, select the appropriate Submission to download it.
Zipped files generated after clicking Download selected Submissions will include a set of folders named after each Supplier. However, the files within each folder will not have the Supplier's name in the filename. Caution should be taken to separate the files or rename them to preserve the Supplier identification per Submission.
Unverified Bid Results
Click to enlarge image
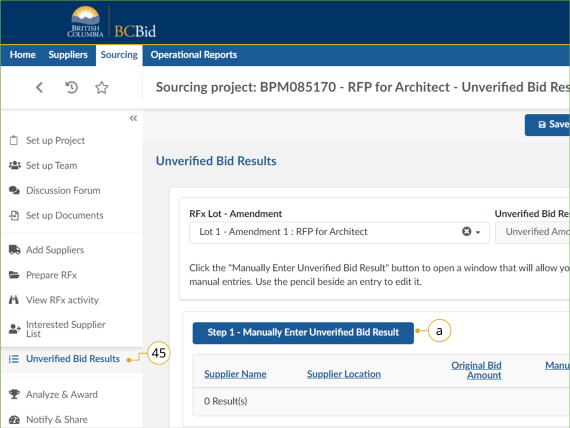
45. In the left-hand menu, click Unverified Bid Results to enter the bid results.
Note: This step is applicable only if the Opening and Unverified Bids used for the RFx checkbox was selected in the Prepare RFx menu, Setup tab.
a. Click Step 1 - Manually Enter Unverified Bid Result.
Unverified Bid Results
Click to enlarge image
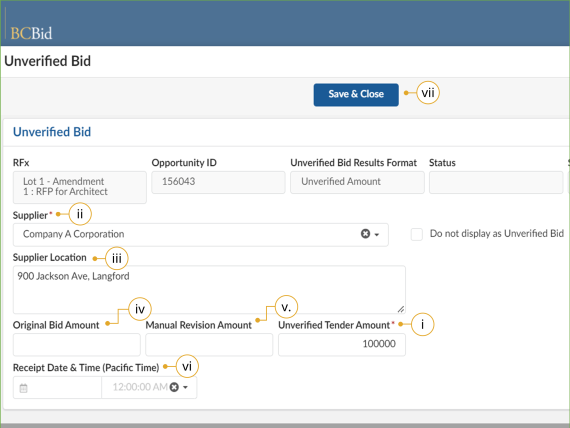
In the dialog box, complete the following:
i. Enter the Unverified Tender Amount.
Note: This field may change depending on the selection made in the Unverified Bid Results Format drop-down list in Prepare RFx – Setup tab.
ii. Select the Supplier from the drop down list.
iii. Optional: Enter the Supplier Location.
iv. Optional: Enter the Original Bid Amount
v. Optional: Enter the Manual Revision Amount.
vi. Optional: Select Receipt Date & Time.
vii. Click Save & Close.
![]() The Do not display as Unverified Bid checkbox allows a Buyer to upload Bids that are not compliant with one or more obvious mandatory criteria. These Bids are not displayed as Unverified Bids.
The Do not display as Unverified Bid checkbox allows a Buyer to upload Bids that are not compliant with one or more obvious mandatory criteria. These Bids are not displayed as Unverified Bids.
Click to enlarge image
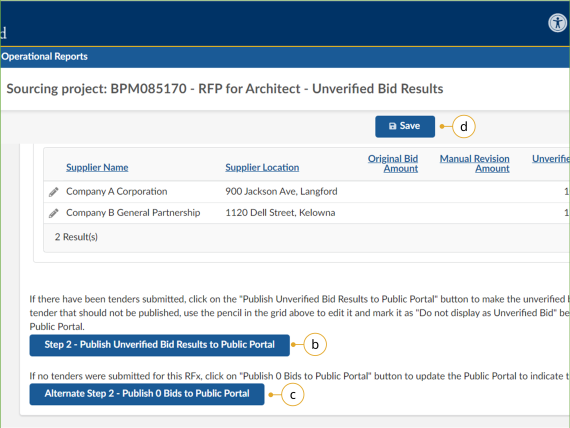
b. Click Step 2 – Publish Unverified Bid Results to Public Portal.
Note: The status of the bids will change to Published.
c. Optional: Click Alternative Step 2 - Publish 0 Bids to Public Portal.
Note: This option will update the Public Dashboard to indicate that there were no bids.
d. Click Save.
Subscribe
Enter your email address to subscribe to updates of this page.

