Publish assets in CMS Lite
Learn how to publish assets in CMS Lite.
On this page
Guidelines for publishing assets in CMS Lite
Asset quantity and size limit
Up to 500 assets, totalling no more than 100 MB can be published in one workflow.
Get notified when the publish job is complete
If you would like to be notified by email when a job has successfully completed, put a checkmark in the 'Notify me when published' box.
- You can also view the Workflow Status Pane to see the progress of the job
Selecting assets for publishing
The following methods will help you select your assets:
To select multiple folders/assets
Use the Shift or Ctrl key method ![]()
To select an individual folder/asset
Click on the asset folder title
Troubleshooting
Assets must be uploaded and published before they will appear on the Production server.
Uploaded assets are automatically saved to the QA server. You must also publish the assets, or they will not be available on the published page.
If you are replacing a published asset, remember to re-publish the asset for the new one to appear on the published page.
How to publish assets
Content editors may publish assets within their security group from the:
- Asset Navigation Pane: Allows you to publish multiple asset folders and assets
- Asset Folder Pane: Allows you to publish selected assets or all assets within a folder
- Asset Settings Pane: Allows you to publish a single asset
Publish assets from the Asset Navigation pane
- Navigate to the applicable location in the Asset Navigation Pane
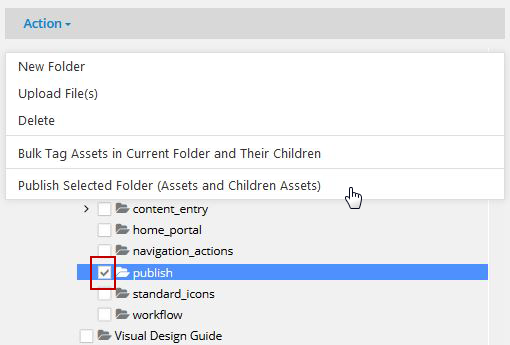
- Check the box next to the Asset Folder(s)

- Click the drop-down Action menu and select Publish Selected Folder (Assets and Children Assets)
- The Publish box will be displayed for selected items(s) and all the children

- To submit the job to the Production web server:
- Immediately:
- Leave the default set to Publish Now
- Click [Confirm]
The Publish box will be closed and a message will be displayed in the top-right corner of the Asset Pane "The Publish Job has been created and contains xx item(s)
- Leave the default set to Publish Now
- At a future date and/or time:
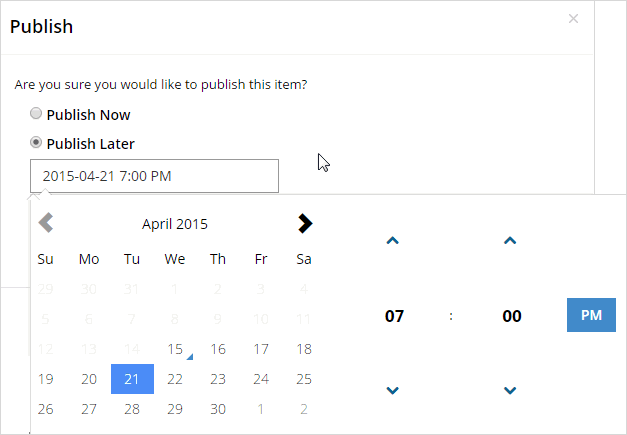
- Select the Publish Later radio button
The calendar will be displayed with the current date and time
- To choose a future date, click on the applicable date in the calendar
- Use the Up and Down arrows, and the [AM/PM] toggle button to specify a new time
- Click outside the calendar but within the Publish box.
The calendar will be closed and the new date and time will be displayed in the field below Publish Later
- Click the [Confirm] button to complete the action
The Publish box will be closed and a message will be displayed in the top-right corner of the Asset Pane "The Publish Job has been created and contains xx item(s)
- Select the Publish Later radio button
- Immediately:
Publish assets from the Asset Folder
- Navigate to the applicable location in the Asset Navigation Pane of the folder containing the assets to be published
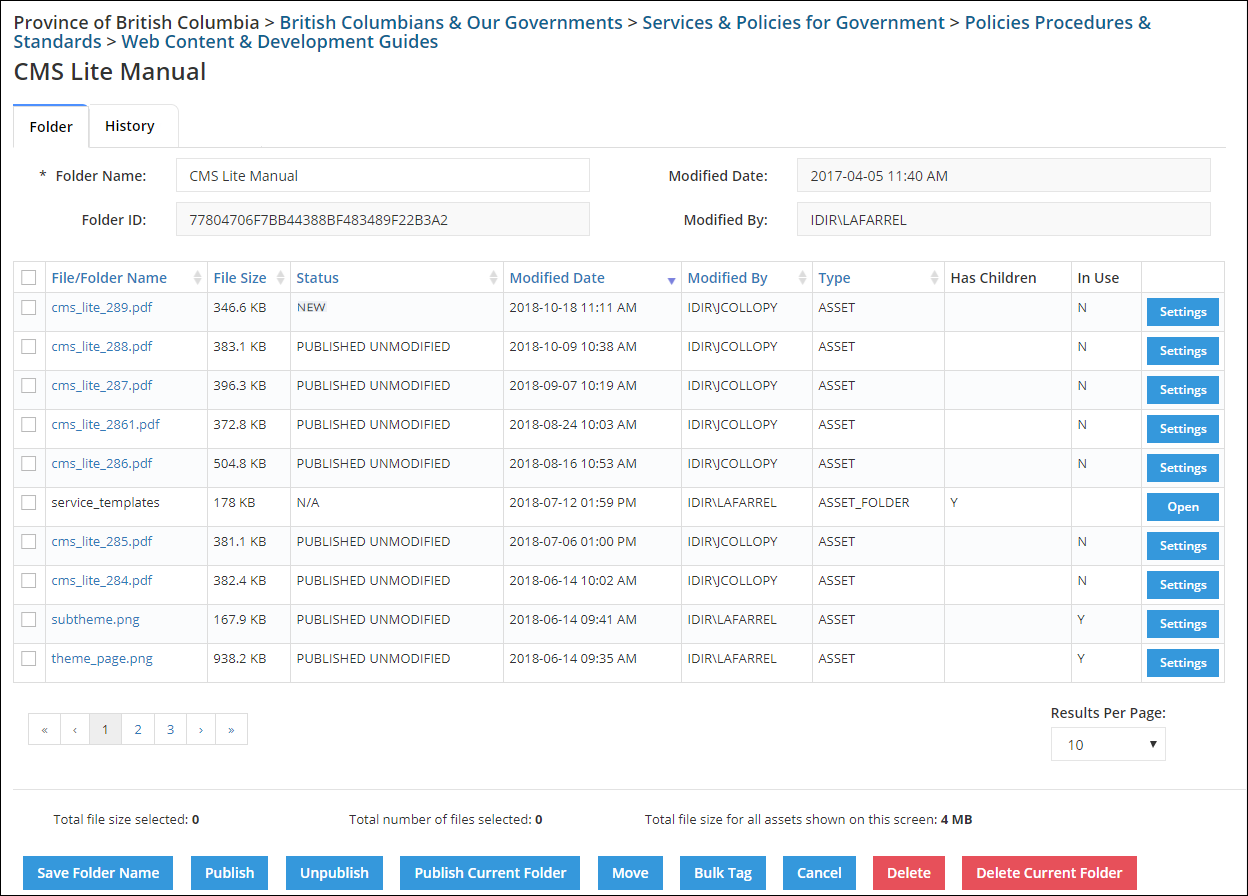
- Click on the asset folder title to display the Asset Folder Pane
- The following options are available:
- Choose the [Publish Current folder] action button to publish all assets in the entire folder
- Check the box
 next to the individual file(s), or select the box next to the File/Folder Name heading
 to select all files displayed in the current grid, and choose [Publish Selected]
- To submit the job to the Production web server immediately, leave the default set to Publish Now and click [Confirm]
The Publish box will be closed and a message will be displayed in the top-right corner of the Asset Pane "The Publish Job has been created and contains xx item(s)"
- To submit the job to the Production web server at a future date and/or time, select the Publish Later radio button
The calendar will be displayed with the current date and time
- To choose a future date, click on the applicable date in the calendar
- Use the Up and Down arrows, and the [AM/PM] toggle button to specify a new time
- Click outside the calendar but within the Publish box.
The calendar will be closed and the new date and time will be displayed in the field below Publish Later
- Click the [Confirm] button to complete the action
The Publish box will be closed and a message will be displayed in the top-right corner of the Asset Pane "The Publish Job has been created and contains xx item(s)"
- To choose a future date, click on the applicable date in the calendar
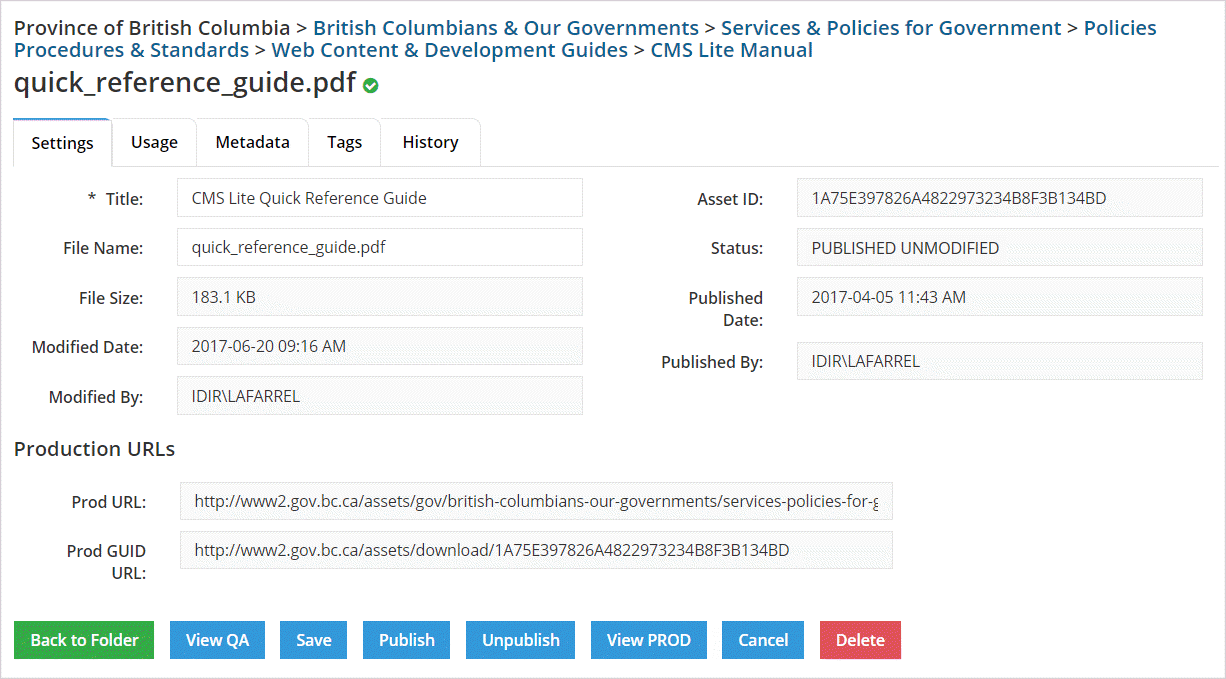
Publish assets from the Asset Settings
- Click the [Publish] action button
- Any unsaved changes to the asset properties (settings, metadata or tags) will automatically be saved as part of the publish action workflow
- Any unsaved changes to the asset properties (settings, metadata or tags) will automatically be saved as part of the publish action workflow
- To submit the job to the Production web server immediately, leave the default set to Publish Now and click [Confirm]
- The Publish box will be closed and a message will be displayed in the top-right corner of the Asset Pane "The Publish Job has been created and contains 1 item"
- To submit the job to the Production web server at a future date and/or time, select the Publish Later radio button
The calendar will be displayed with the current date and time
- To choose a future date, click on the applicable date in the calendar
- Use the Up and Down arrows, and the [AM/PM] toggle button to specify a new time
- Click outside the calendar but within the Publish box.
The calendar will be closed and the new date and time will be displayed in the field below Publish Later
- To choose a future date, click on the applicable date in the calendar
- Click the [Confirm] button to complete the action
- The Publish box will be closed and a message will be displayed in the top-right corner of the Asset Pane "The Publish Job has been created and contains 1 item"


