Step 1 - Create Sourcing Project
Step 1 - Creating Sourcing Project - General Information Form, MULRFQ General Information Form, Set up Project, Copy Sourcing, Set Up Team, Discussion Forum, Set up Documents, Add Suppliers
Notes
- The following sections are for creating sourcing projects for most templates. Please see a list of Ministry templates here
- For ITQs (Procurement Services Branch only) - see ITQ Guide
- ITTs will be managed using the current BC Bid - see ITT Guide
Instructions
Creating Sourcing Project
Click to enlarge image
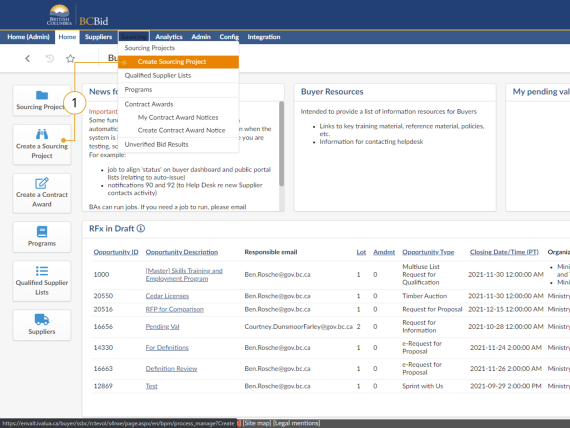
- In the Quick Access menu, click Create Sourcing Project or in the main menu click Sourcing and then Create Sourcing Project.
![]()
Buyers are unable to use team member names to narrow the scope of the Sourcing Project search.
General Information Form
The selection of Sourcing Project type determines the available Opportunity Types within the Sourcing Project. Some Opportunity Types are not available to all ministries. Furthermore, some Opportunity Types have sealed Submissions, which prevents Buyers from viewing Submissions prior to the Closing Date & Time of the Opportunity.
| Sourcing Project Types | Opportunity Types | All Ministries? | Sealed Submissions? |
|---|---|---|---|
| Strategic | Invitation to Quote (ITQ) Request for Information (RFI) Single Use Request for Qualifications (SURFQ) Request for Proposal (RFP) Request for Standing Arrangement (RSA) Request for Submission (RFS) Request for Corporate Standing Arrangement (RCSA) Negotiated Procurement Other Procurement Type |
No Yes Yes Yes No No No No No |
Yes No Yes Yes No No Yes Yes Yes |
| Multi-use List | Multi-use List | Yes | No |
| Timber Auction | Timber Auction | No | Yes |
| Notice to Vendors | Notice to Vendors (NTV) | Yes | No |
| Limited Tendering (NOI/CAN) | Notice of Intent (NOI) to Contract Award Notice (CAN) | Yes | No |
Click to enlarge image
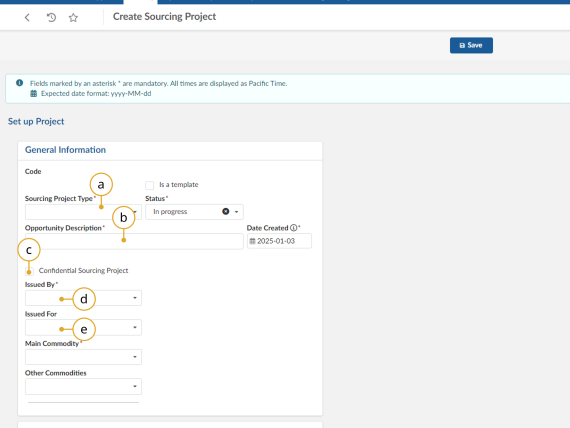
1. In the General Information Form
a. In the Sourcing Project Type drop-down list, select the appropriate Sourcing Project Type.
b. In the Opportunity Description text box, enter a title for the opportunity.
c. If a Buyer needs to run a Confidential Sourcing Project they must contact BC Bid Helpdesk to set up the Opportunity.
d. From the Issued By drop-down list, select the appropriate Organization.
e. Optional: If posting on behalf of another Organization, select the Organization in the Issued For drop-down list. To see more options, click See All.
Click to enlarge image
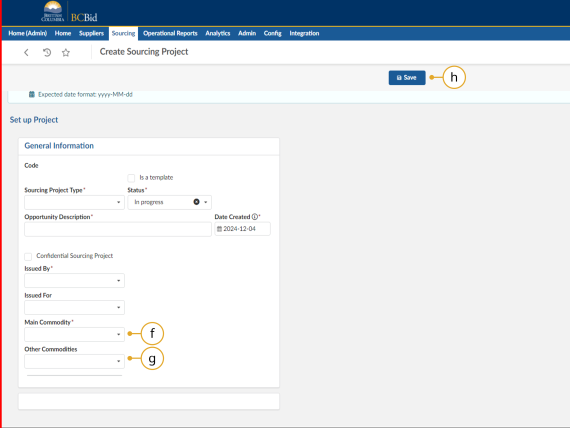
f. In the Main Commodity drop down list, select the appropriate code at the appropriate tier, based on the purchase.
g. Optional: Use the Other Commodities drop-down list to select the appropriate commodities at the appropriate tier, based on the purchase. If a more detailed search is required, select See All.
h. Click Save.
![]()
The Issued by and Issued for fields cannot have the same value as each other. If using Issued for field, select the branch or division at a different level than what is selected in Issued by.
Multi-use List General Information Form
Click to enlarge image
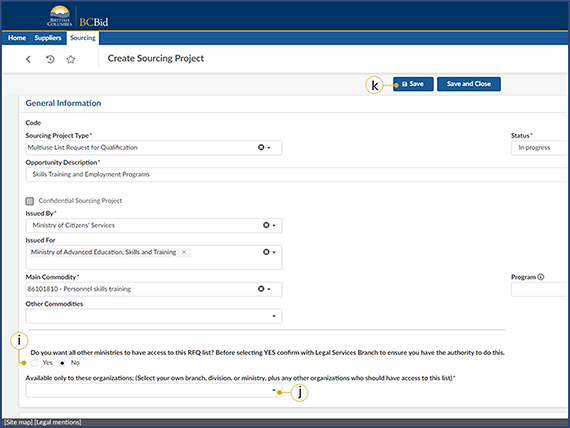
i. If the resulting Qualified Supplier List (QSL) can be accessed by all other ministry organizations, select Yes.
j. If No is selected, then use the Available only to these organizations drop-down list to select the ministry organizations that can access the resulting QSL. If no other ministry organization can access the QSL, then select your ministry or the specific division/branch that is allowed to use the list.
Note: If more than 5 organizations are listed, click the double arrow to view all.
k. Click Save.
![]()
Users must seek legal advice to establish if they have the authority to create QSLs for other ministries. This must be done prior to selecting the Yes radio button for Do you want all other ministries to have access to the RFQ list?
Set up Project
Click to enlarge image
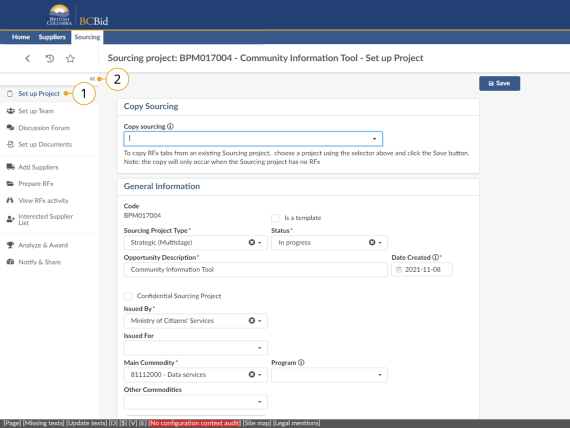
1. In the Set Up Project menu, review the information entered after selecting Create Sourcing Project and make changes, if necessary.
2. Optional: Select the two left-facing arrows to expand or collapse the left-hand navigation pane.
![]()
The Sourcing Project Type can be changed at any point prior to selecting an OpportunityType on the Prepare RFx – Setup tab.
Copy Sourcing
Click to enlarge image
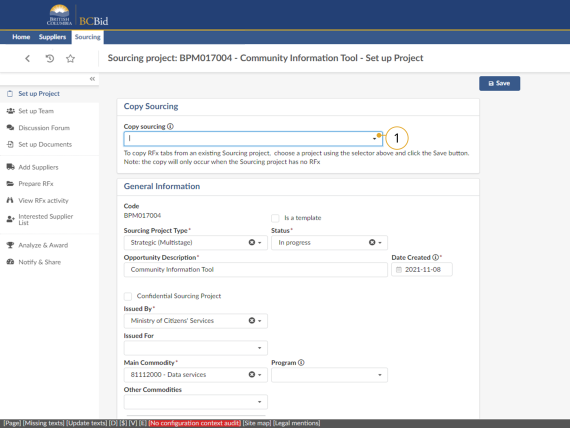
1. In the Set up Project tab, select a previously created Opportunity from the Copy sourcing drop-down list.
Note: Copy sourcing duplicates all data from a previous Opportunity except for the Opportunity ID and Opportunity Description fields. . Some information will only display after the buyer clicks 'Save' on the Prepare RFx. In this scenario, you can only change the Opportunity Type prior to Validate & Save.
![]()
Note that not all Buyers will see the Copy sourcing function.
Set up Team
Click to enlarge image
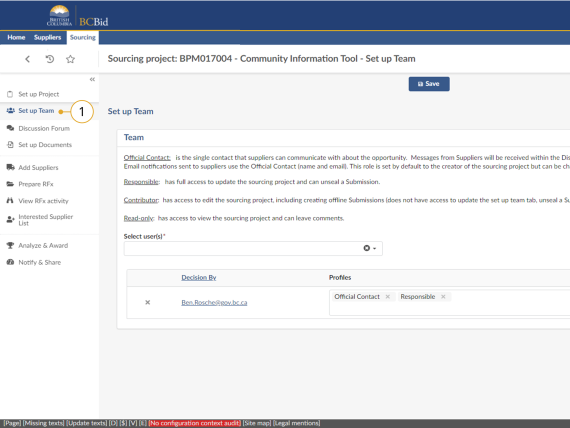
1. In the left-hand menu, click Set Up Team to add team members and assign roles for the project.
![]()
Assigning users to a team can only be done by the user with the Responsible role. The creator of the Sourcing Project is the Responsible by default. This can be changed.
Adding Users
Click to enlarge image
1. To add users to a sourcing team:
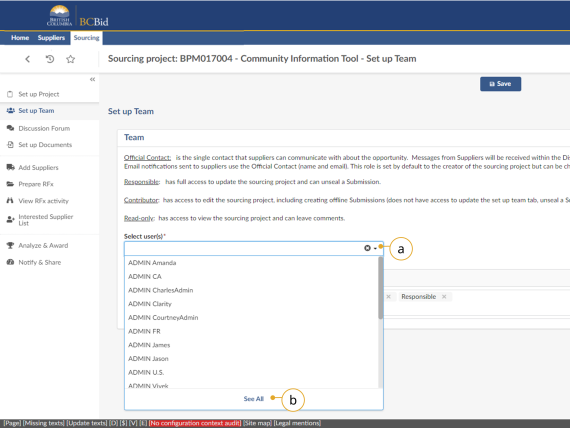
a. In the Select user(s) drop down list, enter the username and select the user to add to the team.
b. In the Select user(s) drop down list, click See all to search using Browse Users.
![]()
It is advised that the Buyer adds users to the team through the process of selecting See All to ensure that the correct user is selected.
Click to enlarge image
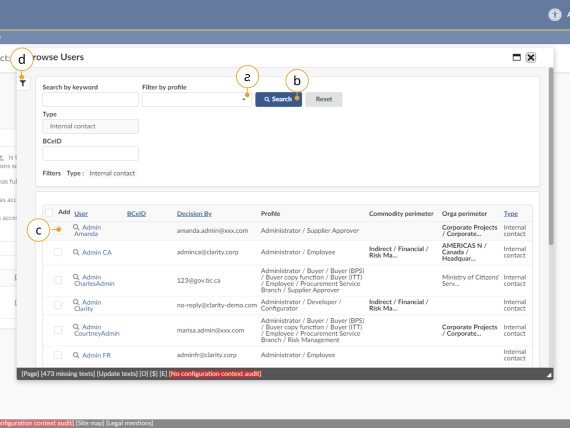
2. In the Browse Users window use Search by keyword to find a user.
a. Select a profile type in the Filter by profile to narrow the search.
b. Click Search.
c. Select the checkbox in the Add column, for the required Users.
d. Optional: Click the pin button to open the advanced filter.
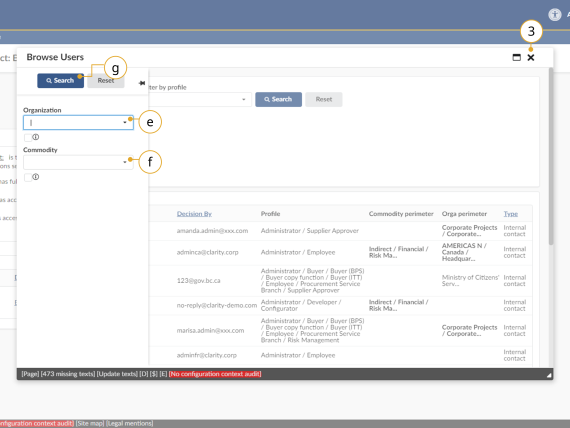
Click to enlarge image
e. Optional: Click the Organization drop-down list to filter users by organization.
f. Optional: Click the Commodity drop-down list to filter users by commodity.
g. Click Search.
h. Repeat steps 2(a) through 2(g) as required.
3. Click X to close the window.
![]()
If a user cannot be found, they may not be registered in BC Bid.
Click to enlarge image
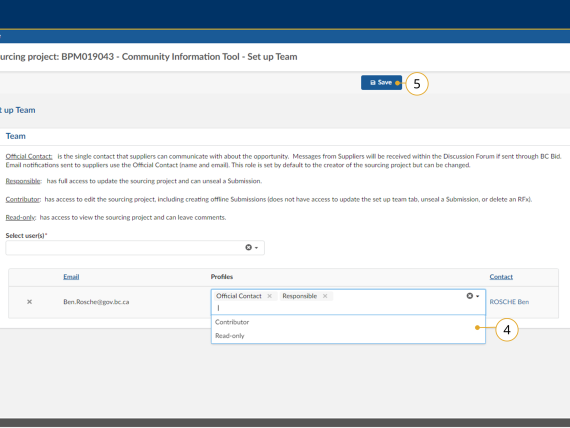
4. Use the Profiles drop-down list to select a profile for the added user.
5. Click Save.
Note: Before reassigning the Responsible role to another user, to ensure you don’t lose access to the Sourcing Project, assign an alternate role to yourself.
Note: There can only be 1 Responsible profile and 1 Official Contact profile assigned. The Official Contact does not have to be the same user as the Responsible profile.
Note: When adding or removing profiles (as per step 4), the page will update with the change in the set up teams tab, but the change has not actually been saved yet. You must still click the save button (Step 5) to finalize the change, otherwise it will revert, and the updated profile will not save.
Remove a User or Profile
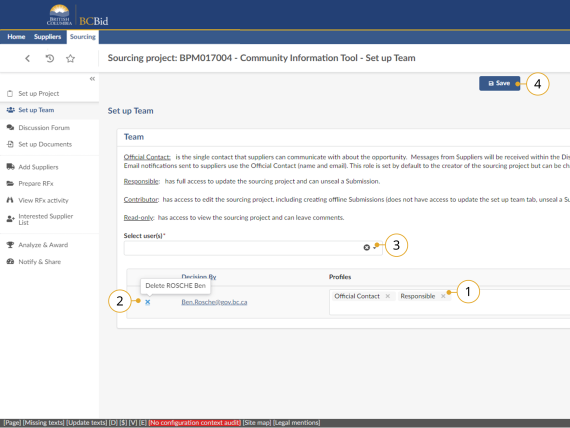
Click to enlarge image
1. Click the X beside a profile to remove that profile for that specific user.
2. Click the X beside a Contact email to remove that user from the team.
3. Click the X in the Select user(s) dropdown to remove the entire team.
4. Click Save.
![]()
To reassign the Responsible role to a new user in an event where the current person acting in that role is no longer available to reassign themselves, someone from the sourcing projects organization should contact the BC Bid Help Desk for assistance.
Discussion Forum
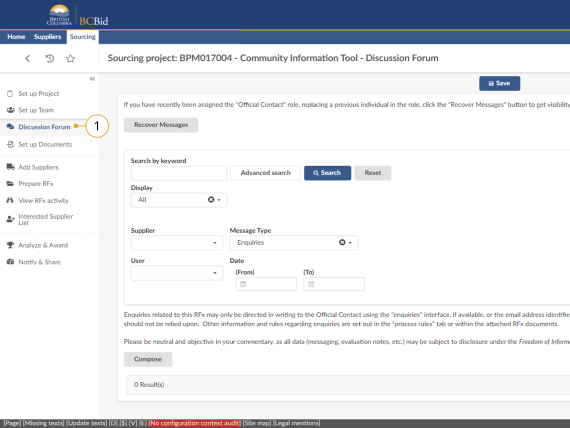
The Discussion Forum allows Sourcing Project teams to keep relevant collaborative discussions in one place for records management. The Official Contact can also communicate with Suppliers, as appropriate, for example issuing Addenda.
Click to enlarge image
1. Optional: In the left-hand menu, click Discussion Forum.
Note: There is no ability to reply directly to other users communications. This is an intentional design to mitigate the risk of sending out potentially sensitive information to all interested suppliers. Best practice is to reformulate the questions and send it out as a separate addenda.
Creating a New Message
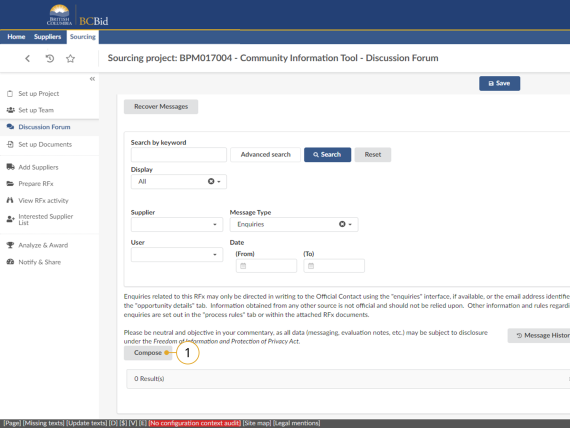
1. Click Compose.
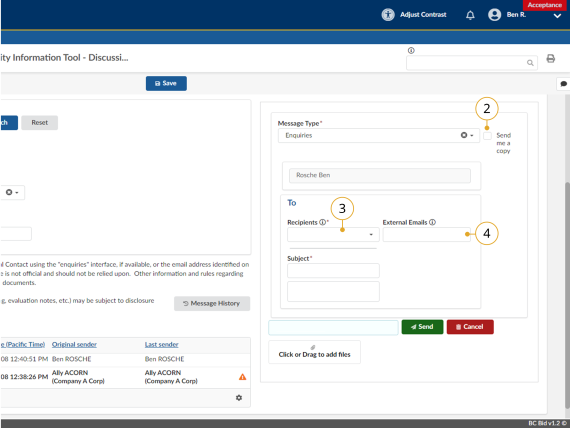
A message field will display to the right of the window. By default, the message type is Enquiries.
2. Optional: Select the Send me a copy checkbox to receive a copy of the email.
3. In the To section, select the recipients using the Recipients drop-down list.
Selectable recipients include sourcing project team members and Suppliers added in the Add Suppliers step.
Recipients are grouped by role.
4. You can send your message to external email addresses by entering the addresses (separated by semi-colons) in the External Emails field.
![]()
Messages emailed by the application (Discussion Form) do not contain attachments. Suppliers (and Buyer team members) need to sign into the application to retrieve attachments. It is recommended that if the buyer attaches files to a message that they make a note in the message text that attachments are available. Buyers should encourage suppliers (or buyers) to register for a BC Bid account.
Click to enlarge image
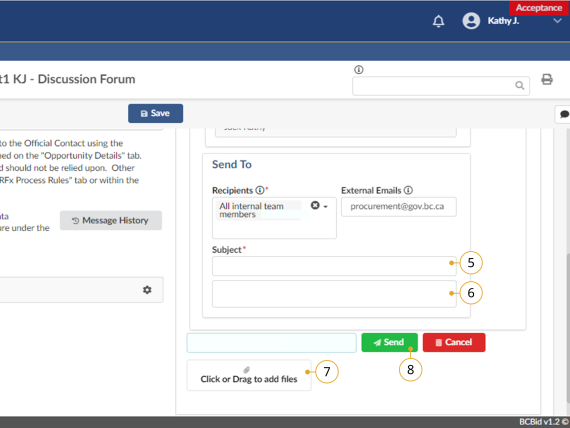
5. Enter the message subject in the Subject field. The Subject should always include the Opportunity ID and Opportunity description.
6. In the field below, enter your message.
7. Add attachments to your message by clicking Click or Drag to add files or directly dragging and dropping a file onto the button.
8. Once your message is ready, click Send.
![]()
You cannot delete a message once it has been sent.
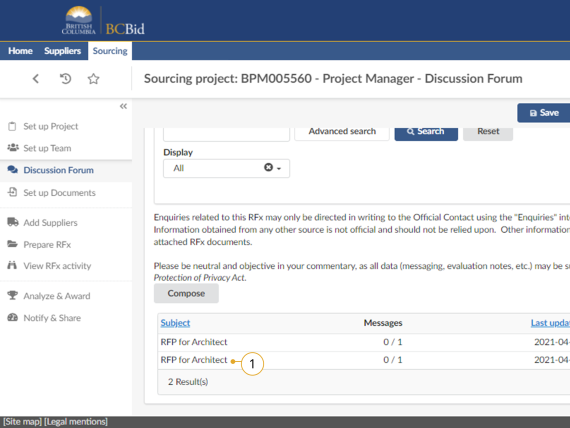
Print a Communication
Click to enlarge image
1. Select the communication you would like print.
![]()
Buyers should note that when archiving message data for an Opportunity, i.e. the 'message history', they will need to the print out of each message plus the Excel file to establish who was sent each message. An Excel document showing the content isn't going to cut it so we'll need both. The message spreadsheet can be downloaded via the cog icon.
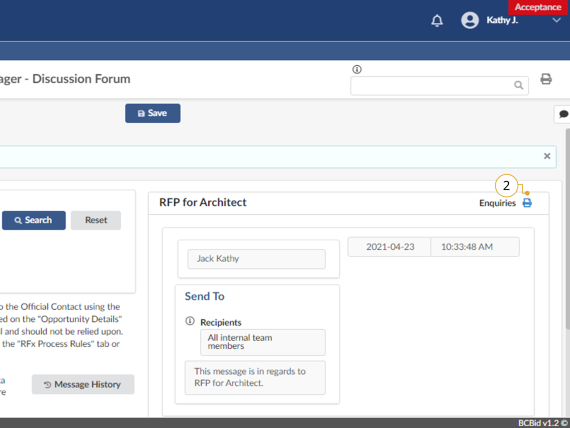
Click to enlarge image
2.Click the Print (printer) icon.
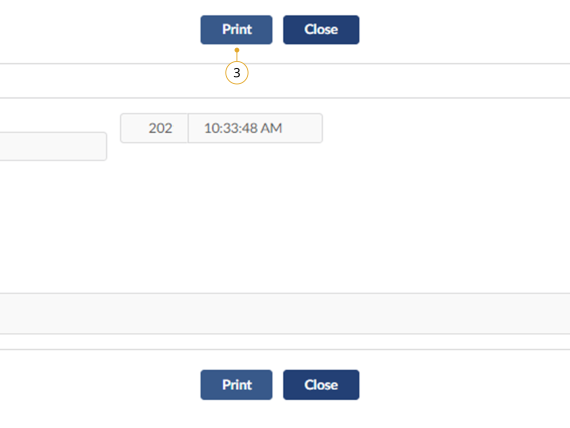
Click to enlarge image
3. In the dialog box, click Print.
Set up Documents
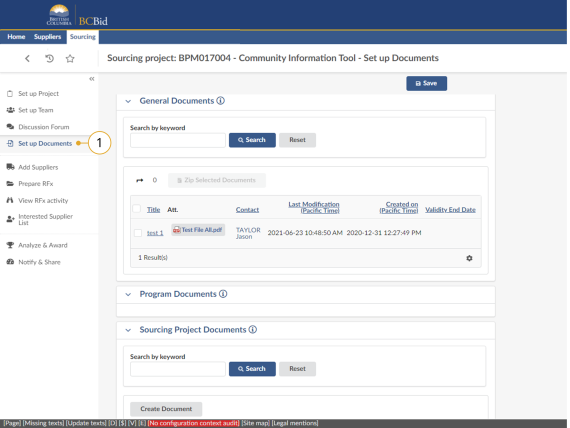
Click to enlarge image
1. In the left-hand menu, click Set Up Documents.
![]()
Provides a list of all the General Documents and Sourcing Project Documents that are relevant to the project. Buyers can use this screen to upload Sourcing Project Documents.
Uploading Documents
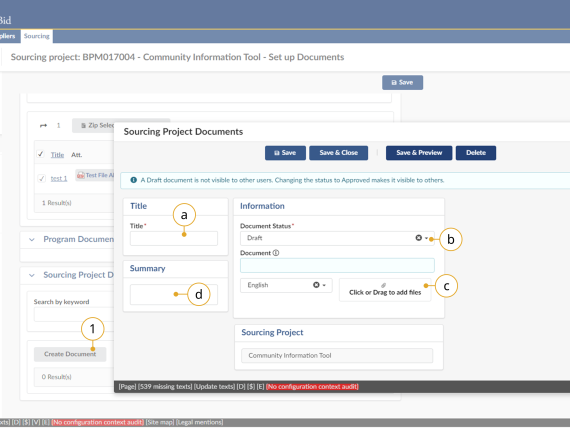
1. Click Create Document.
a. Enter a Title.
b. Using the Document Status drop-down list, select Draft or Approved.
c. Optional: Enter a Summary
d. Open the file manager application by clicking Click or Drag to add files.
![]()
Buyers must only upload 1 document per upload.
Click to enlarge image
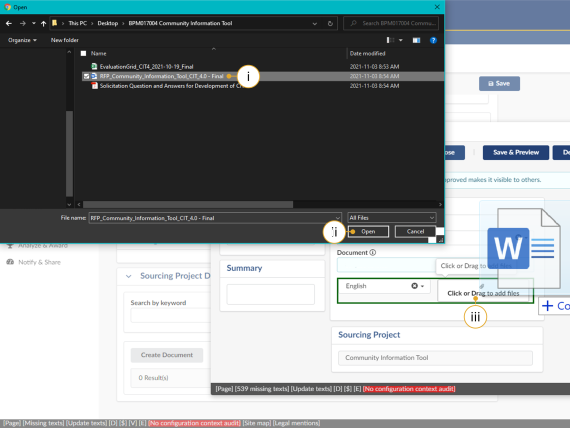
i. Select the document to upload.
ii. Click Open.
iii. Alternatively, open Windows Explorer and drag the file to the Click or Drag to add files button.
Click to enlarge image
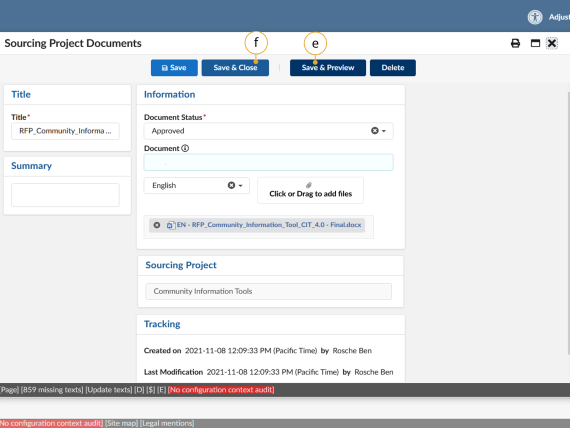
e. Click Save & Preview to preview the uploaded documents from a Supplier perspective.
f. Click Save & Close to upload.
Downloading Existing Documents
Click to enlarge image
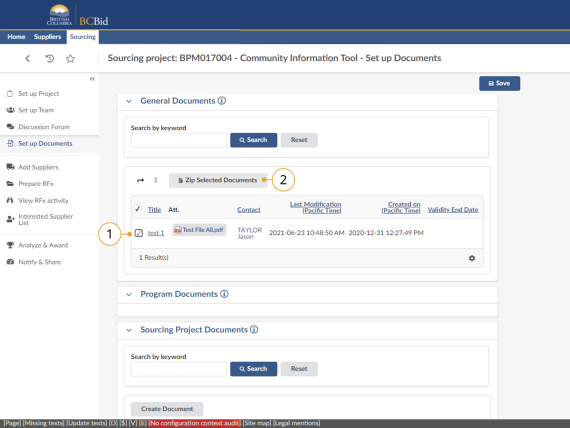
1. Select the Checkbox next to the document(s) to be downloaded.
2. Click Zip Selected Documents to download the document(s).
Click to enlarge image
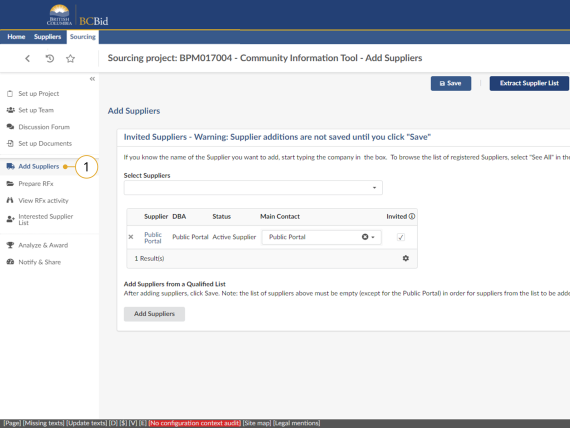
1. Optional: In the left-hand menu, click Add Suppliers to create a list of invited suppliers.
Adding Suppliers Not On Qualified List
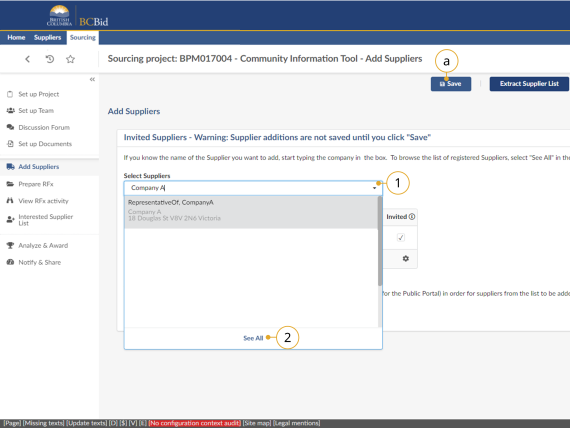
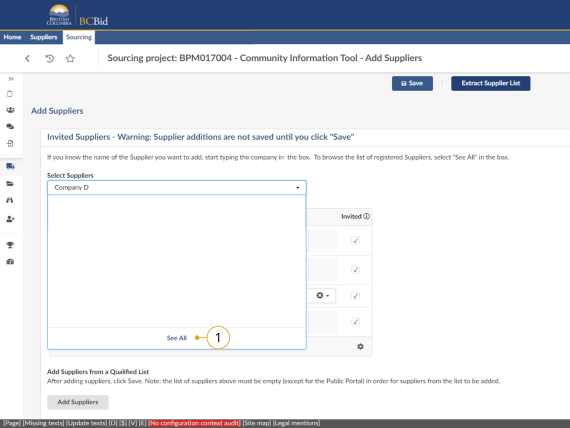
1. In the Select Suppliers drop-down list, start typing in the name of the Supplier to be added, then select it when it displays.
a. Click Save.
2. If unable to find the Supplier, click See All.
NOTE: In the Select Suppliers drop-down you will be able to identify Shell Suppliers as they will be marked with [SHELL (Unregistered) Supplier] to the right of the supplier name. Please do not invite a [SHELL (Unregistered) Supplier] to an invite-only sourcing project as these accounts cannot be used to log in and view the details of the opportunity. If you wish to invite a supplier to an invite-only opportunity they are required to register for their own account prior to being invited.
![]()
Once an opportunity is posted, Suppliers that are selected here will get a notification.
Browse Suppliers
Click to enlarge image
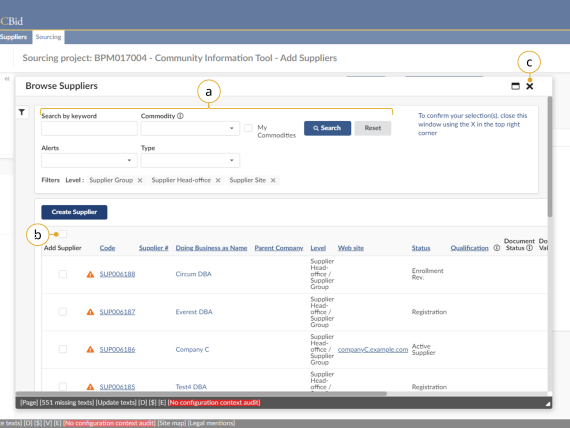
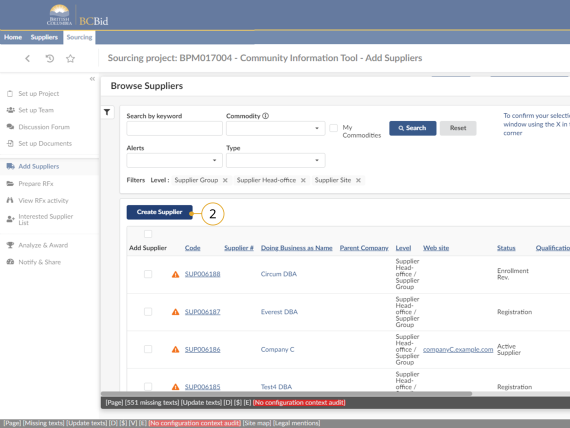
a. In the Browse Suppliers window, filter Suppliers using setting search parameters. Once search parameters are set, click Search.
b. Once the Supplier(s) to be added are found, select the checkbox(s) in the Add Supplier column.
c. Click the X to add and close the Browse Suppliers window.
d. When the Browse Suppliers window closes, click Save on the Add Suppliers tab.
Removing Suppliers and Extracting Supplier List
Click to enlarge image
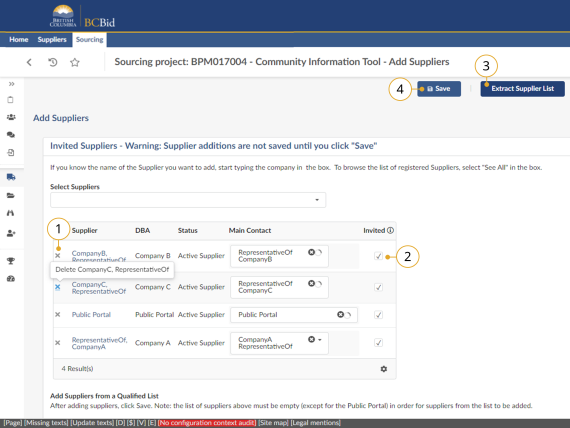
1. To remove a Supplier, select the X next to the Supplier name.
2. To remove a Supplier from the invitation list, select the checkbox in the Invited column.
3. Click Extract Supplier List.
4. Click Save
![]()
For limited competitions that are below trade thresholds or competitions that are run off a Qualified Suppliers List, do not remove Public Portal from the invitation. Public Portal will be selected for all opportunities (including invite-only) so addenda will be visible to all suppliers. A Supplier cannot be removed once an Opportunity is posted.
Creating a New Supplier
Creating a new Supplier is used when the Buyer is uploading Submission data from a Supplier that is not yet identified in BC Bid. Buyers should ensure that the Supplier does not yet exist, prior to creating a new one. If a duplicate is found, contact the BC Bid Help Desk.
Click to enlarge image
1. In the Select Suppliers drop-down list, select See All.
Click to enlarge image
2. In the Browse Suppliers window, click Create Supplier.
Click to enlarge image
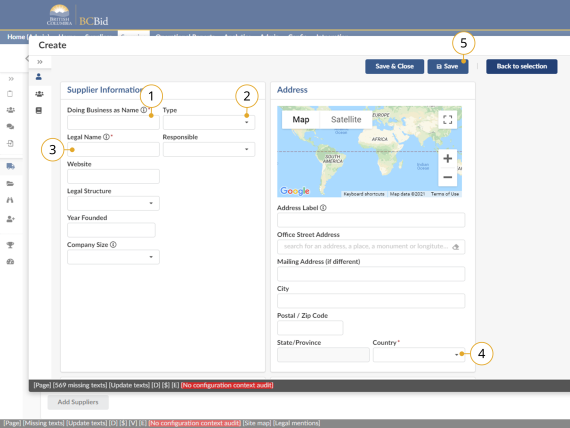
1. In the Doing Business as Name textbox, enter the business name the Supplier is operating as.
2. In the Type drop-down list select Vendor or Shell for offline Submissions, as applicable.
3. In the Legal Name textbox, enter the Suppliers legal name.
4. In the Country drop-down list, select the Country the Supplier is in.
5. Click Save.
Note: SHELL supplier accounts require an address to comply with trade agreement requirements.
Click to enlarge image
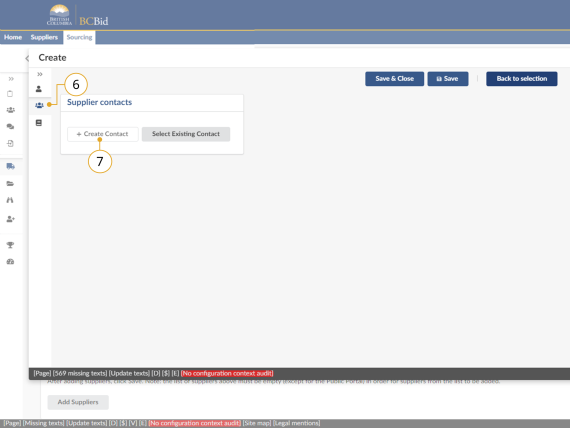
6. In the left-hand navigation pane, click the Contacts tab.
7. Select the + Create Contact button.
Click to enlarge image
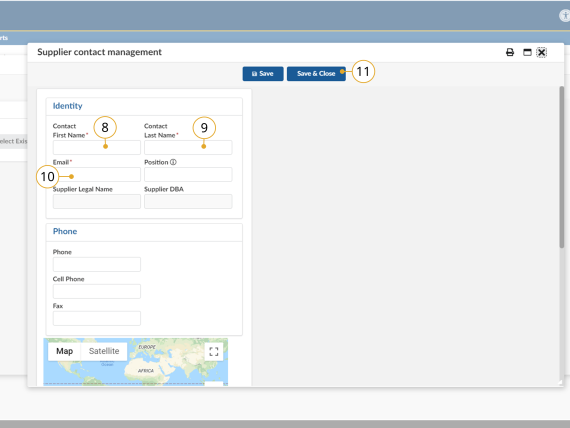
8. In the Contact First Name textbox, enter the Supplier contact’s first name.
9. In the Contact Last Name textbox, enter the Supplier contact’s last name
10. In the Email textbox, enter the Supplier contact’s email address.
11. Click Save & Close.
Click to enlarge image
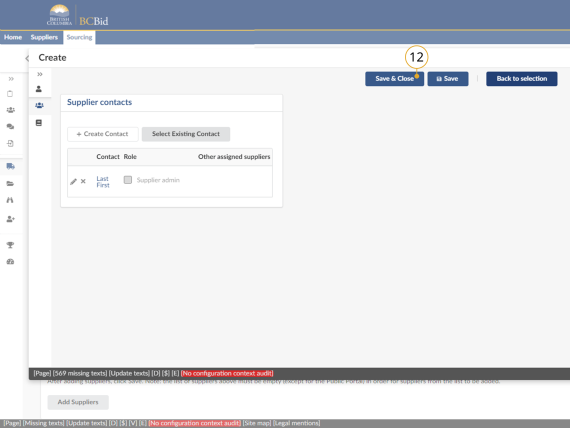
12. Click Save & Close.
Adding Suppliers From a Qualified Suppliers List
Click to enlarge image
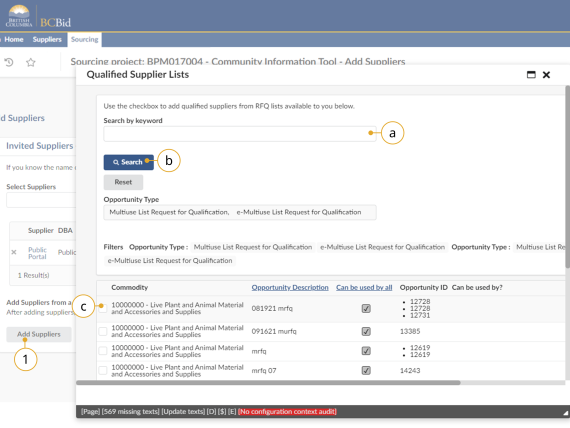
1. Click Add Suppliers.
a. Insert a keyword in the Search by keyword textbox.
b. Click Search.
c. When the Qualified Suppliers List is located, select the checkbox to add the Qualified Suppliers List.
d. Click Save after the Qualified Suppliers List closes.
Subscribe
Enter your email address to subscribe to updates of this page.

