Publish assets and content using 'Publish Later'
Learn how to publish a CMS Lite page at a future date or time.
Overview of using 'Publish later'
CMS Lite allows content editors to create pages in advance and published to the Production web server at a specified time and date. This feature is helpful when trying to line up with a news release or a program announcement.
Page lock
Until the scheduled job is completed, the Lock icon will appear in the Content Status Pane or the Content Pane.
Once a scheduled page has been published to the Production web server, the Lock icon will no longer appear.
Updating a page that is scheduled to be published
Content changes can be made to a scheduled job without cancelling the workflow.
Cancel or reschedule a scheduled job
Use the workflow status pane to view, cancel, or reschedule a scheduled job.
Get notified of completed jobs
Check the 'Notify me when published' box if you would like to be notified by email when a job has successfully completed. You can also view the Workflow Status Pane to see the progress of the job.
Publishing entire asset folders
When publishing assets within the Assets screen, you can submit an entire folder to Production.
Steps to publish a page or asset immediately
Step 1. Navigate to the applicable pane
If necessary, navigate to the applicable pane:
- Select the nodes (pages) or assets for publishing
- Select the Assets button to view the Asset Status Pane
- Use the [Publish] action button above the Content or Asset Status grid
- Select the nodes (pages) for publishing
- Choose Publish Selected or Publish Selected with Children from the Action menu
- Select the [Publish] action button at the bottom of the Content Pane
- Publish progress will be displayed next to the Title above the template tabs
- Select the asset folder(s) for publishing
- Choose Publish Selected or Publish Selected with Children from the Action menu
- Publish Selected only publishes the folder, not the assets within it. Asset folders should be republished if renamed or moved
- Choose the [Publish current folder], or select the asset(s), then the [Publish] action button
- Select the [Publish] action button at the bottom of the Asset Settings Pane
- Publish progress will be displayed next to the Title above the asset tabs
Step 2. Confirm the publishing option
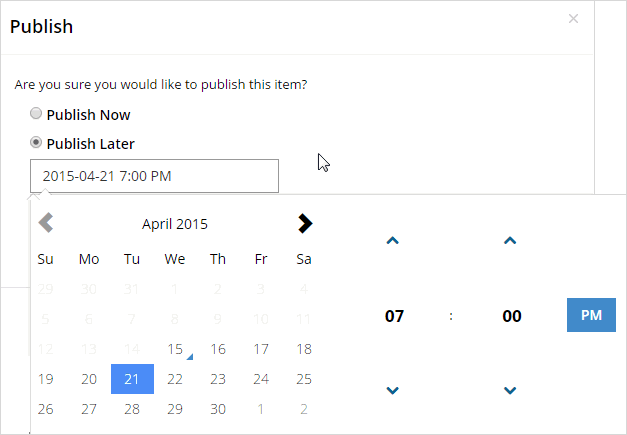
The Publish dialog box will be displayed when the publish action is selected.
- Select the Publish Later radio button
The calendar will be displayed with the current date and time
- If applicable, click a new date in the calendar
- Use the Up and Down arrows, and the [AM/PM] to specify a new time
- Click outside the calendar (but within the Publish box) to close
The calendar will be closed and the new date and time will be displayed in the field below Publish Later
- If applicable, click a new date in the calendar
- Click the [Confirm] button to complete the action
The Publish box will be closed and a message will be displayed in the top-right corner of the screen "The Publish Job has been created and contains xx item(s)"
Subscription component
If a Subscribe component exists in the right column, an additional check box [Notify subscribers of this page] will display in the Publish dialog box. Review the Subscribe page for more details.

